#
Java
title: Install JAVA label: Install JAVA order: 100 authors:
- name: Charl Cronje email: charl@webally.co.za link: https://blog.webally.co.za avatar: https://assets.webally.co.za/avatars/darker.jpg edit: repo: "https://github.com/charlpcronje/setup.docs.devserv.me/edit/" base: /src branch: main label: Edit on GitHub editor: enabled: false favicon: favicon.png links:
- text: Projects Portfolio link: https://webally.co.za/projects
- text: Wiki, Tips and Docs link: https://docs.webally.co.zao.za
- text: Resume link: https://cv.webally.co.za
- text: LinkedIn link: https://www.linkedin.com/in/charlpcronje
- text: GitHub link: https://github.com/charlpcronje
- text: Upwork Profile link: https://www.upwork.com/freelancers/~01ccb1439024ec9c50 footer: copyright: "webAlly © Copyright . All rights reserved."---
Install the Java Development Kit with the following command:
sudo yum install java-11-openjdk-develInstall OpenJRE 11
Java Runtime Environment 11 (Open JRE 11) is a subset of OpenJDK. Therefore, both packages are included in the command:
sudo yum install java-11-openjdkThe official Oracle JDK is not available for download from the local repository. You have to download the .rpm package from the Java SE Downloads page.
After the download is complete, you can install the package with the command:
sudo yum localinstall jre-VERSION-linux-x64.rpm
#
Verify Java is Installed on Your System
The following command shows which Java release you have and confirms installation was successful:
java –version
#
Install Specific Version of Java
You can also install any of the other versions of Java by changing the version number in the command.
#
Install JDK 8
- You may decide to use Open JDK 8, instead of the default OpenJDK 11.
- To do so, type in the following command in the terminal:
sudo yum install java-1.8.0-openjdk-devel
#
Install JRE 8
As a subset of Open JDK 8, you can install Open JRE 8 by typing in the command:
sudo yum install java-1.8.0-openjdk
#
Install Oracle Java 12
- As previously mentioned, you have to download Oracle Java from its official page.
- To install the newest version, simply download the appropriate package from their webpage and continue with the installation.
#
How to Set Default Java Version
- Since you can have multiple versions of Java installed on your system, you can decide which one is the default one. To do so;
- Run a command that shows all the installed versions on your computer:
sudo alternatives --config java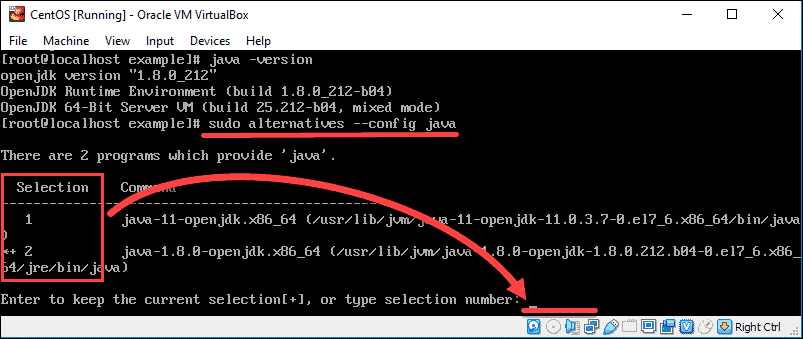
- The image above shows that there are two alternatives to this system. These choices are represented by numbers 1 (Java 11) and 2 (Java 8).
- To change the default version, type the associated number (in this case, 1 or 2) and press Enter.
#
How to Set JAVA_HOME Environment Variable
- First, locate where Java is installed:
sudo update-alternatives --config java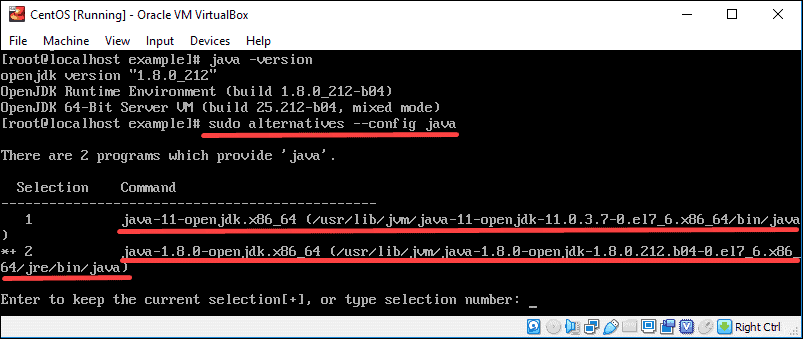
In the output, you can find the path for each Java package installed on the system.
- /usr/lib/jvm/java-11-openjdk-11.0.3.7-0.el7_6.x86_64/bin/java (where OpenJDK 11 is located)
- /usr/lib/jvm/java-1.8.0-openjdk-1.8.0.212.b04-0.el7_6.x86_64/jre/bin/java (where OpenJDK 8 is located)
- Once you see all the paths, copy the one of your preferred Java version.
- Then, open the .bash_profile with any text editor. In this example, we use vim:
nano .bash_profile- At the bottom of the file, add a line which specifies the location of
JAVA_HOMEandJAVA_JREin the following manner:
You will get the following output.
export JAVA_HOME="/your/installation/path/"
export JRE_HOME="/your/installation/path/jre"
For example, if we copy the installation path for Java 11 in the previous step, the added line in the text editor will be:
/usr/lib/jvm/java-11-openjdk-11.0.3.7-0.el7_6.x86_64/bin/javaNow source the file using the following command.
source ~/.bash_profileNow you can run the echo $JAVA_HOME and echo $JAVA_JRE command again to check if the environment variable is set or not.